The Christmas season is official over. The tree is down, the cookies have all been eaten (although there is still some boozy fruitcake hiding in my cupboard!)
So, to celebrate winter, I bought a daffodil.
Somehow, grocery store potted bulbs are just what I need in the dull days of January and February.
A friend is going south (which seems wise) and I volunteered to make her a neck wallet for her passport.
I looked at the patterns available, and didn't see exactly what I wanted, but I did see a picture of a commercial one, that looked right.
I realized that it was a variation of the Double-Zip Wristlet, a tutorial by Bethany at Sweet Bee Buzzings. So I got out my passport, measured it up, and started to work.
I completed the front pocket, and thought I had better check to see if the passport fit.
Okay, looks good. Then I tried to put the passport through the zippered opening.
It is too narrow, by the width of the zipper slide. I completely forgot to take into account the zipper slide in my measurements.
Okay, Passport Wallet, take 2!
It fits! It slides in and out with ease. As you may be able to tell from the pictures, for awhile I was buying Oriental fat quarters. This seemed like a good way to use them up. However, I didn't really plan it use one for non-passport wallet.
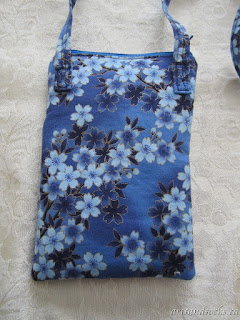
Here is the completed wallet and strap. Don't look too closely at the top stitching on the strap. 1/2 inch straps are really hard to top stitch and keep the stitching straight.
The back pocket can hold an itinerary, or boarding pass. I added a pocket for a credit card, or maybe a coffee card, so the user will have quick access to pay for snacks en route.
I sewed the strap to the back. I considered using a swivel clip and D-ring, but I didn't want any metal since it has to go through airport security.
I asked Bethany if I could post my changes to her pattern, and she graciously agreed, so if you want to make one, here are my measurements:
I used 2 fat quarters, and some scraps of interfacing and fusible fleece.
The general directions are the same as the tutorial.
Before you start, measure your passport. These measurements work for a Canadian passport. I don't know if they are standardized. I made the bag 2 1/4" wider and 2 1/2" longer than my passport.
From the exterior fat quarter, cut 2 pieces 2" x 22" for the strap, 2 pieces 7 1/2" x 5 1/2" for the exterior, 2 pieces 2" x 5 1/2" for the top of the front pocket, and 2 pieces 6" x 5 1/2" . I used 2 pieces of SF101 (woven interfacing) cut 7 1/4" x 5 1/4", and two pieces of fusible fleece cut 7" x 5" and fused those to the back side of the exterior pieces.
From the lining fat quarter, cut 2 pieces 7 1/2" x 5 1/2"., and 1 piece 3" x 7" for the slip pocket.
I followed Bethany's tutorial. Before I started sewing the top zipper, I made the slip pocket by folding it in half, sewing around, leaving an opening to turn, and top stitched it to a lining piece, 1 1/2" from the top edge, and centred on the lining piece.
The two pieces for the strap were joined, to make a 40" piece, I folded it into 4 and top stitched the edges (poorly). I attached the strap to the back, 1 1/2" down from the zipper, and 1 1/4" in from the side edges.
The top of my bag would have been tidier if I had trimmed more fabric away from the zipper seams, before I turned it, but I only realized that after I closed the bottom seam.
Thanks to Bethany for posting such an awesome Tutorial. I will be making more of these.


We have eaten all our boozy fruitcake.
ReplyDeleteWhat a nifty idea! I already have a cross-body bag which is just right for travelling (and has been used) but this is certainly worth considering too......your fabric is very pretty.
I really like your modifications! I don't travel much, but when I do I always feel like I'm struggling to find papers or to hold on to everything.
ReplyDeleteDid it warm up for you yet? We finally got out of the freeze and are having warm temps, but are set to freeze again this weekend.